
 Pin it
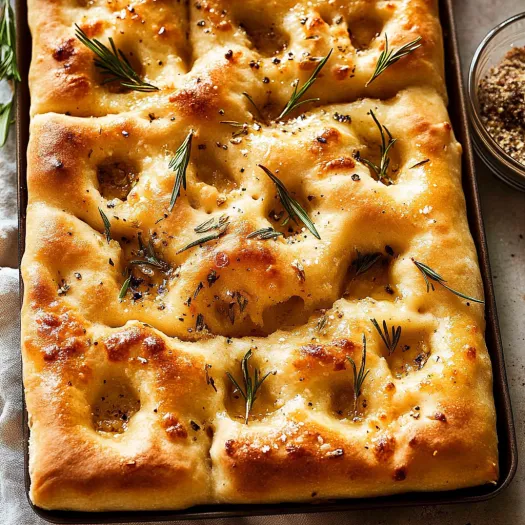
Focaccia Barese combines pillowy interior with crackling crust creating an authentic Italian bread experience unlike any other. The distinctive texture comes from the unexpected addition of potato which creates a tender crumb structure with pleasant chew that keeps you reaching for another piece. This regional specialty from Bari transforms simple ingredients into something extraordinary through proper technique and patience rather than complicated methods.
I discovered this recipe during a culinary journey through southern Italy where a local grandmother invited several travelers into her kitchen. Despite language barriers, her methodical demonstration communicated everything we needed to understand about this beloved bread. Upon returning home, recreating this focaccia transported me instantly back to that sun drenched kitchen filled with aromatic olive oil and animated conversation. Now whenever I serve this bread to guests, they inevitably request the recipe before leaving.
Essential Ingredient Selection
- Mashed potato: Introduces unique tender texture while providing fermentable starches for yeast development
- Bread flour: Creates optimal gluten structure supporting the high hydration formula
- Extra virgin olive oil: Contributes characteristic Mediterranean flavor while developing crispy exterior
- Instant yeast: Provides reliable rising without activation steps required by other varieties
- Sea salt: Enhances flavor throughout dough while creating pleasant finishing texture when sprinkled before baking
- Warm water: At precisely 40°C activates yeast without killing beneficial microorganisms
- Cherry tomatoes: Release sweet concentrated flavor during baking while creating colorful presentation
Bread Making Process
- Dough Formation:
- Begin by boiling one medium potato until completely tender when pierced with fork, approximately twenty minutes depending on size. Drain thoroughly before mashing into smooth consistency without lumps. Measure precisely 500 grams bread flour into large mixing bowl before adding instant yeast, salt and sugar, whisking thoroughly to distribute ingredients evenly. Create well in center of dry ingredients before pouring warm water and olive oil into depression. Mix initially with wooden spoon until shaggy mass forms before incorporating mashed potato completely throughout mixture.
- First Development:
- Using wet hands to prevent sticking, fold dough against itself creating smooth surface tension despite sticky consistency. Shape into loose ball before covering bowl with plastic wrap or damp kitchen towel. Place in warm draft free environment approximately 24°C for thirty minutes allowing first fermentation to begin. Properly developed dough expands noticeably while developing small bubbles throughout structure indicating active yeast multiplication.
- Second Strengthening:
- Transfer partially risen dough to separate bowl generously coated with olive oil ensuring easy removal later. Fold dough systematically by grabbing edge furthest from you, stretching upward slightly before folding toward center. Rotate bowl quarter turn repeating process until completing six total folds around circumference. Cover again with plastic wrap before returning to warm location thirty additional minutes during which structure continues developing while flavor compounds multiply.
- Pan Preparation:
- Select metal baking pan approximately 26 by 20 centimeters allowing proper thickness for authentic texture. Pour generous tablespoon olive oil across bottom surface ensuring complete coverage including corners and sides. Prepare selected toppings during this waiting period, slicing tomatoes, measuring olives, and preparing garlic olive oil infusion by gently warming minced garlic in olive oil until fragrant without browning. Collect fresh herbs ensuring they remain vibrant until final assembly.
- Final Formation:
- Transfer developed dough to prepared pan, using oiled fingertips to gradually stretch toward edges without tearing delicate gluten structure. Leave dough slightly short of pan edges as expansion continues during final proofing stage. Cover pan loosely with plastic wrap before returning to warm location approximately forty minutes during which volume increases noticeably. Properly proofed dough appears puffy with visible air bubbles beneath surface indicating readiness for topping application.
- Signature Finishing:
- Press fingertips deeply into risen dough creating characteristic dimpled surface texture while releasing trapped carbon dioxide. Drizzle additional olive oil across entire surface watching it pool in created depressions. Apply selected toppings strategically across surface ensuring proper distribution without overloading any section. Press tomato halves cut side up into surface, scatter olives evenly, or drizzle garlic infused oil before sprinkling fresh herbs. Finish with generous sprinkle sea salt crystals across entire surface enhancing flavor complexity.
- Baking Excellence:
- Place prepared focaccia into preheated 220°C oven positioned in center rack ensuring even heat distribution. Bake approximately twenty-five minutes until surface achieves deep golden brown coloration and edges develop crispy texture against pan sides. Properly baked focaccia sounds hollow when bottom is tapped with knuckles indicating complete interior cooking. Transfer immediately to cooling rack allowing steam to escape without creating soggy bottom texture.
My fondness for potato enriched focaccia connects directly to childhood memories watching my Italian neighbor prepare similar bread for community gatherings. She explained that during lean times, potato extended precious flour while simultaneously improving texture. This practical wisdom transformed necessity into culinary advantage that persists despite modern abundance. Each time I incorporate potato into focaccia dough, I honor this resourceful tradition while appreciating how humble ingredients combine to create something truly special through time tested techniques.
Perfect Pairing Suggestions
Serve still warm focaccia alongside aged balsamic vinegar and premium olive oil creating simple yet elegant antipasto course. Consider offering thinly sliced prosciutto and fresh mozzarella allowing guests to create personalized mini sandwiches during casual gatherings. For summer entertaining, present alongside chilled gazpacho in small glasses creating refreshing combination perfect for outdoor dining experiences.
Regional Variations
Experiment with caramelized onions spread across surface before baking creating sweet aromatic topping popular in northern Italian regions. Consider incorporating small cubes aged pecorino cheese pressed into dough surface before baking resulting in pockets of savory richness throughout finished bread. For Ligurian inspiration, top with thinly sliced potatoes, rosemary and flaky sea salt creating hearty variation perfect alongside roasted meats during autumn gatherings.
Freshness Preservation
Store completely cooled focaccia wrapped in parchment paper followed by kitchen towel maintaining optimal moisture balance up to two days. Refresh day old bread by sprinkling lightly with water before warming in 160°C oven approximately ten minutes restoring crispy exterior. Consider slicing leftover focaccia horizontally creating base for open faced sandwiches topped with Mediterranean inspired ingredients. Freeze individually wrapped portions up to one month, thawing completely before reheating for best texture restoration.
This Focaccia Barese represents everything wonderful about traditional Italian bread baking through its celebration of simple ingredients transformed through thoughtful technique. Throughout my culinary journey, I've discovered that authentic regional recipes typically involve fewer ingredients than their modern interpretations while demanding greater attention to process details. The magic emerges through understanding fermentation, proper hydration, and temperature control rather than complicated additions. Whether serving this focaccia alongside simple soup or presenting it as starting course for elaborate dinner party, its rustic elegance consistently creates memorable dining experiences connecting us to centuries of Mediterranean culinary tradition.
Recipe FAQs
- → Why does this focaccia recipe include potato?
- The mashed potato adds moisture and creates a wonderfully soft interior while maintaining a crispy exterior. It's a traditional technique that helps the bread stay fresh longer and gives it that perfect texture contrast.
- → Can I use all-purpose flour instead of bread flour?
- Yes, you can use all-purpose flour, though the crumb won't be quite as chewy. For the best texture, bread flour is recommended, especially if making this focaccia for guests.
- → Why do I need to make dimples in the focaccia dough?
- The dimples are a signature feature of focaccia that serve both aesthetic and functional purposes. They create pockets for the olive oil to pool, adding flavor, and they help control the rise of the dough during baking.
- → Can I prepare the focaccia dough ahead of time?
- Unlike some breads, this focaccia is best made on the day you plan to serve it. Testing showed that refrigerating the dough for several days actually reduced its rising power and resulted in a denser bread.
- → How should I store leftover focaccia?
- Focaccia keeps well for a few days in a sealed zip-lock bag. For the best texture, reheat it in the oven to restore the crispy exterior and make the inside soft and fluffy again.
- → Why do you need to cook the garlic in oil before using it as a topping?
- Raw garlic would burn at the high temperature needed to bake focaccia. Making confit garlic by gently poaching it in oil softens it so it won't burn during baking, allowing it to become golden and slightly crisp instead.